Labels

Showing posts with label Recipe. Show all posts

Saturday, January 4, 2014

Fantastic Salsa

I hate buying salsa...it just doesn't taste good to me.  I want the kind of salsa that taste like tomatoes, onions and cilantro...fresh!  I tried canning my own salsa, I didn't like that either.  When the tomatoes in my garden are in season, I make a lot of fresh salsa.  But what happens in the winter?  Do I have to succumb to yucky salsa bought in the stores?  Nope!!  I love Pinterest...I find lots of great things.  Not long ago I found a recipe called "Quick and Easy Blender Salsa".  I gave it try, it took about 10 from start to finish.  Mike and I LOVED it...it is a keeper recipe, for sure!

Quick & Easy Blender Salsa

(1) 14 oz canned diced tomatoes
(1) 10 oz can original Rotel *
1/2 small onion, roughly chopped
1 clove garlic, peeled & smashed                
1/2-1 jalapeno, seeded **
1 tsp honey
1/2 tsp salt
1/4 tsp ground cumin
small to medium size handful of cilantro, washed
juice of one lime


Instructions

Put all ingredients in the base of a food processor or good blender and pulse to combine for 30 seconds or so until all the ingredients are finely chopped and salsa is desired consistency.  Taste for seasoning and adjust to taste. 

* I did not use Rotel. I used Winco brand chopped tomatoes with chile's ~ much cheaper
** I used one entire jalapeno, seeded.  Seeds can be added for a spicier salsa.

I was out of chips...so I cut up several corn tortillas, sprayed them with some oil and sprinkled them with some salt.  I placed them in a 450 degree oven for 10 minutes.  (May get done faster so keep your eye on them.)  I am not going to lie...these are not as good as those chips that are fried in oil. but they were quite good and crunchy...and definitely healthier.


Wednesday, January 1, 2014

Happy 2014!

Happy 2014!  I can't believe another year has zipped right on by.  I love this time of year...I love taking the time to reflect on what I (and my family) have accomplished the past year and I like taking the time to think about new goals for the new year. 

I have been off work since December 20th...so I have been spending a LOT of time organizing my home and in a way...my life.  I (and my husband) burned up one paper shredder and put our brand new one under heavy use.  Closets have been cleaned out, they pantry organized...and lots of lists being made. 

Today I took the whole day to make muffins, muffins and more muffins.  I made triple chocolate muffins for Cassidy (can that really be considered a muffin...or an unfrosted cupcake?)  I made blueberry muffins for my husband.  Normally for me I make a cream cheese pumpkin muffin...but I found a new recipe to make today. 

Sweet Apple Butter Muffins.  Since I canned a bunch of apple butter this past fall, I thought this would be a good way to use it up.  And...it was a great muffin!  Even my "it is not a muffin unless it has blueberries" husband loved this new muffin.  I found this recipe in the "Gooseberry Patch Mom's Favorite Recipes" cookbook.

1-3/4 cup all purpose flour
1/3 cup plus 2 T. sugar divided *                
2 t. baking soda
1/2 t. cinnamon
1/4 t. nutmeg
1/4 t. salt
1 egg, beaten
3/4 cup milk
1 t. vanilla extract
1/4 cup oil
1/2 cup apple butter **
1/3 cup chopped pecans ***

Combine flour, 1/3 cup sugar, baking soda, cinnamon, nutmeg and salt in a large mixing bowl; set aside.  Blend egg, milk, vanilla and oil together; mix into flour mixture. Spoon about one tablespoon batter into each muffin cup (can be paper-lined...I didn't line with paper); add one teaspoon apple butter. Fill muffin cups 2/3 full with remaining batter; set aside. Toss pecans with remaining sugar; sprinkle evenly on tops of muffins. Bake at 400 degrees until a toothpick inserted in the center removes clean...about 20 minutes.  Makes one dozen.

*I did not use this extra sugar.  Instead I sprinkled the top of the muffins with a cinnamon sugar blend.

**I thought I was supposed to use a tablespoon on apple butter...not 1 teaspoon.  More is better I think.

***Did not top with pecans...my husband wouldn't have tried them if I had.  Still tasted great.

I made over 70 muffins today...doubled each batch.  They are tucked into the freezer and will make a great breakfast for us all for the next month or two!

Thursday, April 4, 2013

Feeling Energetic

I dont' know if it is because it is spring...or if it is because I have been counting calories and limiting the bad stuff...but whatever it is, I have more energy then normal.

My butt, back and shoulders are sore from planting my red and purple potatoes yesterday...but I will blog more about that soon.  I am behind on my gardening.  We have had beautiful weather (up to today) but most days we spent out of town at a volleyball tournament.  I will need to get a bunch of starts going this weekend. 

Tonight I came home and cooked.  Actually, I came home with a good share of our dinner already cooking.  My favorite youngest daughter is home on spring break so I had her make pulled pork in the crockpot.  BUT...I didn't let her make it with bottled bbq sauce ~ rather, she got to make it homemade from a new recipe I just found.  I am going to post the recipe but I am kind of afraid because the website has this scary sounding warning about "duplication of any content...".  However it was adapted from Emeril Legasse and I found it on the Cinnamon Spice & Everything Nice blog.  Visit her blog...she has a TON of yummy recipes.


Crockpot Barbecue Pulled Pork

3 tsp. paprika (can use a combination of sweet and/or smoked)
2 tsp. dry mustard
1 tsp. dried oregano
1 tsp. dried thyme
1½ tsp. salt
1/2 tsp. black pepper
1/2 tsp. cayenne pepper, optional                                                                        
1 tsp. onion powder
1/2 tsp. garlic powder
1 (6oz) can of tomato paste
1½ cups beef broth
1/2 cup cider or white vinegar (or a combination of both)
6 tbsp. brown sugar
1½ cups sliced onions
6 cloves garlic, finely chopped
3 pounds boneless pork roast

In a large crockpot whisk everything except the onion, garlic and pork together until well combined.  Stir in onion and garlic and add the pork roast (you can cut the pork roast in half first for a shorter cooking time).  Cook on high 4-6 hours or until you can shred the pork easily with two forks; after shredding pork, I continued to cook for additional 1+ hour.

I served the bbq pork topped with fresh made coleslaw all on a homemade roll that I had in the freezer.  I found the coleslaw recipe via what2cook.  I actually found both these recipes on Pinterest...I am becoming a total Pinterest junkie...but I will save that story for a different blogging day. 
 
KFC Coleslaw Copy Cat

8 cups finely chopped cabbage (I used one head)
1/4 cup shredded carrot (I used one carrot)
2 tbsp. minced onion
1/3 cup sugar
1/2 tsp. salt
1/8 tsp. pepper
1/4 cup milk
1/2 cup mayonnaise (I used more, I like a thicker dressing)
¼ cup buttermilk
1½ tbsp. vinegar
2½ tbsp. lemon juice

Mix all together.  Taste amazing!
 
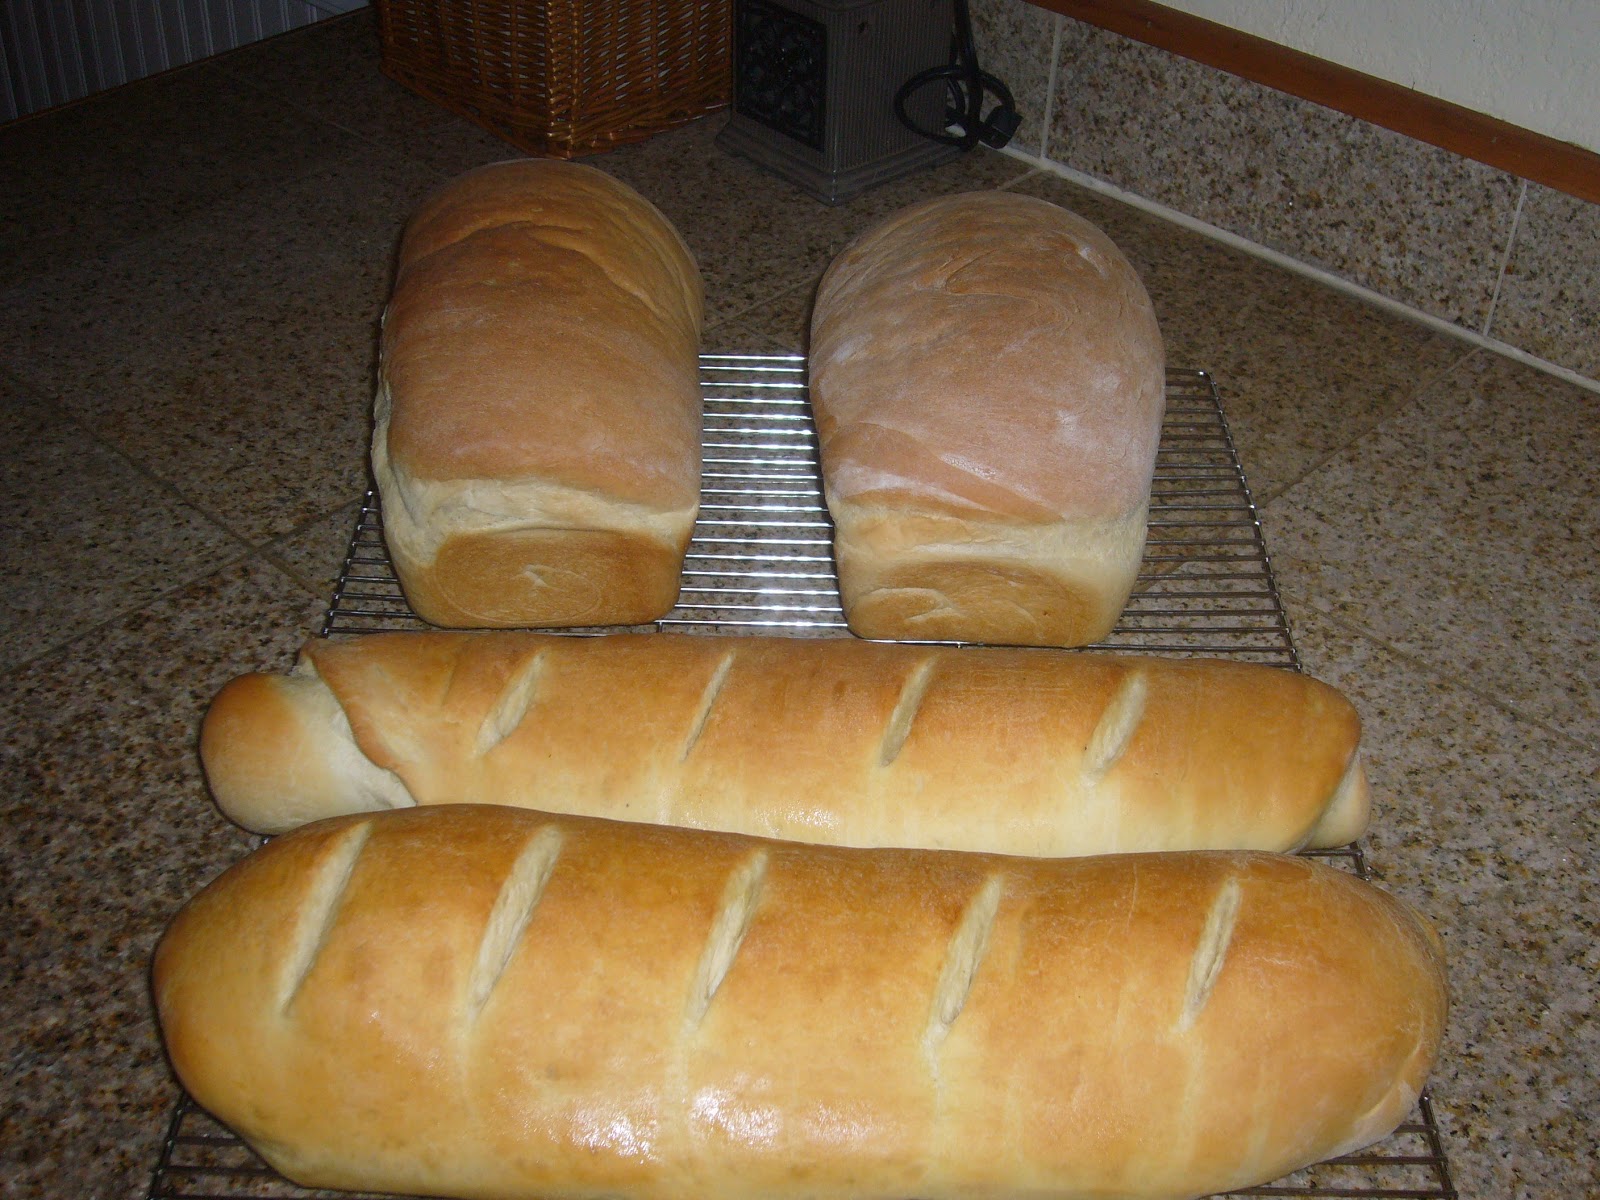
Finally, in between getting the pork finished up and making the coleslaw, I made a couple loaves of regular bread, I got some pizza dough into the freezer and made my first ever batch of French Bread.  I got a lot done before 7:00 pm tonight!  I love when I have such productive days. 


This was my first attempt at making french bread...and one loaf turned out beautifully!  The other loaf doesn't look as good but I am sure it will taste just fine.  Right at this moment...my house smells wonderfully of homemade bread ~ no better smell that I know of.

Sunday, February 17, 2013

2013 ~ The Year of Making Homemade Bread

I begged my husband for a new KitchenAid mixer...told him it would be a WONDERFUL Christmas present and to make the deal even sweeter...I promised I would make homemade bread on a regular basis.

Well...I got the KitchenAid!!

And...I haven't bought a loaf of bread at all in the year 2013!

We have gone through a lot of bread flour because the bread is so good...we are eating too much.  However, I see a slow down in bread consumption now that we are 1/2 way through Febrauary. 

I haven't stopped at bread...I now use this bread dough for making pizza crusts, hamburger buns, hotdog buns and hoagy rolls.  The shapes are definately a work in progress...but it still tastes amazing ~ regardless of how badly they look.

The bread recipe I use is one I found while reading a fabulous book titled:  "The Weekend Homesteader ~ a Twelve-Month Guide to Self-Sufficiency" written by Anna Hess. 

Here is the recipe we love:

1 1/3 cup water ~ warm (baby-bottle temperature)
2 T. sugar
1 T. yeast
1 T. olive oil
2 t. salt (I use Kosher)
3 cups bread flour

In a mixing bowl add sugar, yeast and warm water...let proof for about 10 minutes until it resembles a "foamy mass".  I then add the olive oil, salt and bread flour.  I mix for 8 minutes in the KitchenAid with the hook on low speed.  I sometimes need to add more bread flour to keep it from sticking to the bowl as it mixes.  When mixed, rub the dough with a bit of olive oil, cover with a warm wet towel and let rise until double in a draft-free, warm spot for about one hour.  When done, roll into shape (I push it into an oblong shape and roll up tightly...and put it into a sprayed bread pan.  Let rise a second time until double...another hour.  Bake at 350 degrees for about 20 minutes.  When done, thump on the top of the bread loaf to make sure it sounds "hollow"...that means your bread is cooked all the way through.

My Notes:

1.  I triple my batch when I make it.
2.  For pizza dough ~ after the first "rising" I roll the dough into a ball, wrap it in sprayed   saran wrap and put it into the freezer.  Take it out and thaw it in the fridge about a day before you plan to use.
3.  I have used 1/2 the amount of sugar...worked and tasted fine.
4.  I have used 1/2 olive oil and 1/2 canola oil...again worked fine.
5.  When I make a triple batch, I only use about 5 tsp of kosher salt.


Don't take making bread seriously...have fun with it!  It may take a few batches to get the hang of it...but it is worth it to keep trying. 


Monday, January 7, 2013

Muffins, Muffins and more Muffins

It is hard to believe that Christmas has come and gone!  I have to admit that the best part of Christmas is the week after when I am off work and have the chance to read, bake, clean, organize and cross-stitch...without any time limits.  I love nothing more than puttering around the house!

My favorite youngest daughter has a "team bonding" slumber party with her volleyball team...and I said I would bring muffins for breakfast the next day.  My first thought was that I would run to the bread outlet store and grab an assortment of donuts and muffins but then quickly changed my mind.  I am trying to make more of our foods and rely less on purchased/processed foods.  Plus, I had 6 over-ripe bananas, frozen sliced strawberries I purchased this past summer from a local farmer and everything else needed to make a variety of homemade muffins.  After "googling" all sorts of muffin recipes, I ended up making Banana Crumb Muffins, Chocolate Strawberry Muffins and Pumpkin Cream Cheese Muffins.  Yum!  I made enough to send with my favorite youngest daughter and still have a ton to put in the freezer for quick breakfasts.  The recipe below was my favorite:


Pumpkin Cream Cheese Muffins
  
Cream Cheese Filling
4 oz. cream cheese
1/4 cup sugar
Mix together very well and chill in the refrigerator.  (Chilling the filling helps keep it from absorbing into the muffin mix while baking). 
 
Muffins
3/4 cup sugar
1/2 cup vegetable oil
1 cup pumpkin puree
2 eggs
1 3/4 cup flour
1/2 tsp. baking soda
1 ½ tsp. cinnamon
1/2 tsp. ginger
1/2 tsp. nutmeg
1/4 tsp. cloves
Mix the sugar, oil, pumpkin, and eggs together very well in a large mixing bowl.  Then plop the flour, baking soda, and spices on top of the blended wet mixture.  Stir well to incorporate and fully mix everything together.  Oil or spray a muffin pan.  Spoon about 1-2 tablespoons of batter into the bottom of each muffin and make sure the bottom is covered with the batter.  Next, distribute  approximately 1 tablespoon of cream cheese mixture on the batter.  Finally top more of the batter over each to cover the cream cheese…approximately 2-3 tablespoons.  Bake at 350° for 20-25 minutes.  Let cool before eating.


Sunday, July 1, 2012

Sunday Breakfast at its BEST!

I saw a really wonderful recipe on a blog I follow and knew I had to attempt it.  I did not follow the recipe on the blog ~ rather I went online and found a shortcake recipe that I liked and built this wonderful dessert breakfast my way.

I will call this my 4th of July Special:

Shortcake:

2 cups flour
4 tsp baking powder
3/4 tsp salt
1/4 cup sugar
2 tbsp butter
2 tbsp shortening
3/4 cup 1/2 and 1/2

Preaheat oven to 400 degrees.  In a large bowl, combine flour, baking powder, salt and sugar.  Cut in butter and shortening.  Mix in 1/2 and 1/2.  Drop by large spoonfuls onto a baking sheet.  Bake for 15 minutes or until brown.  (Original recipe came from Alton Brown via the foodnetwork.com website.  I did adapt it a bit.)

While the shortcake is cooking, I washed and dried the strawberries (1 pound) and sliced them up; sprinkle with sugar and stir.  I then whipped up my whip cream...no cool whip for this girl ~ yuk!  I added sugar and a bit of vanilla to the heavy cream...I whipped mine until fairly firm. 

When the shortcake was cool, I broke it up and placed half of it on the bottom of my trifle bowl.  I topped that with half of my sliced strawberries, slathered half the whipped cream on the strawberries and topped with a cup of blueberries...and started the layer over again (red, white and blue).  

This dessert breakfast was amazing and I think I will be taking it with me to my families 4th of July get-together!

Saturday, June 30, 2012

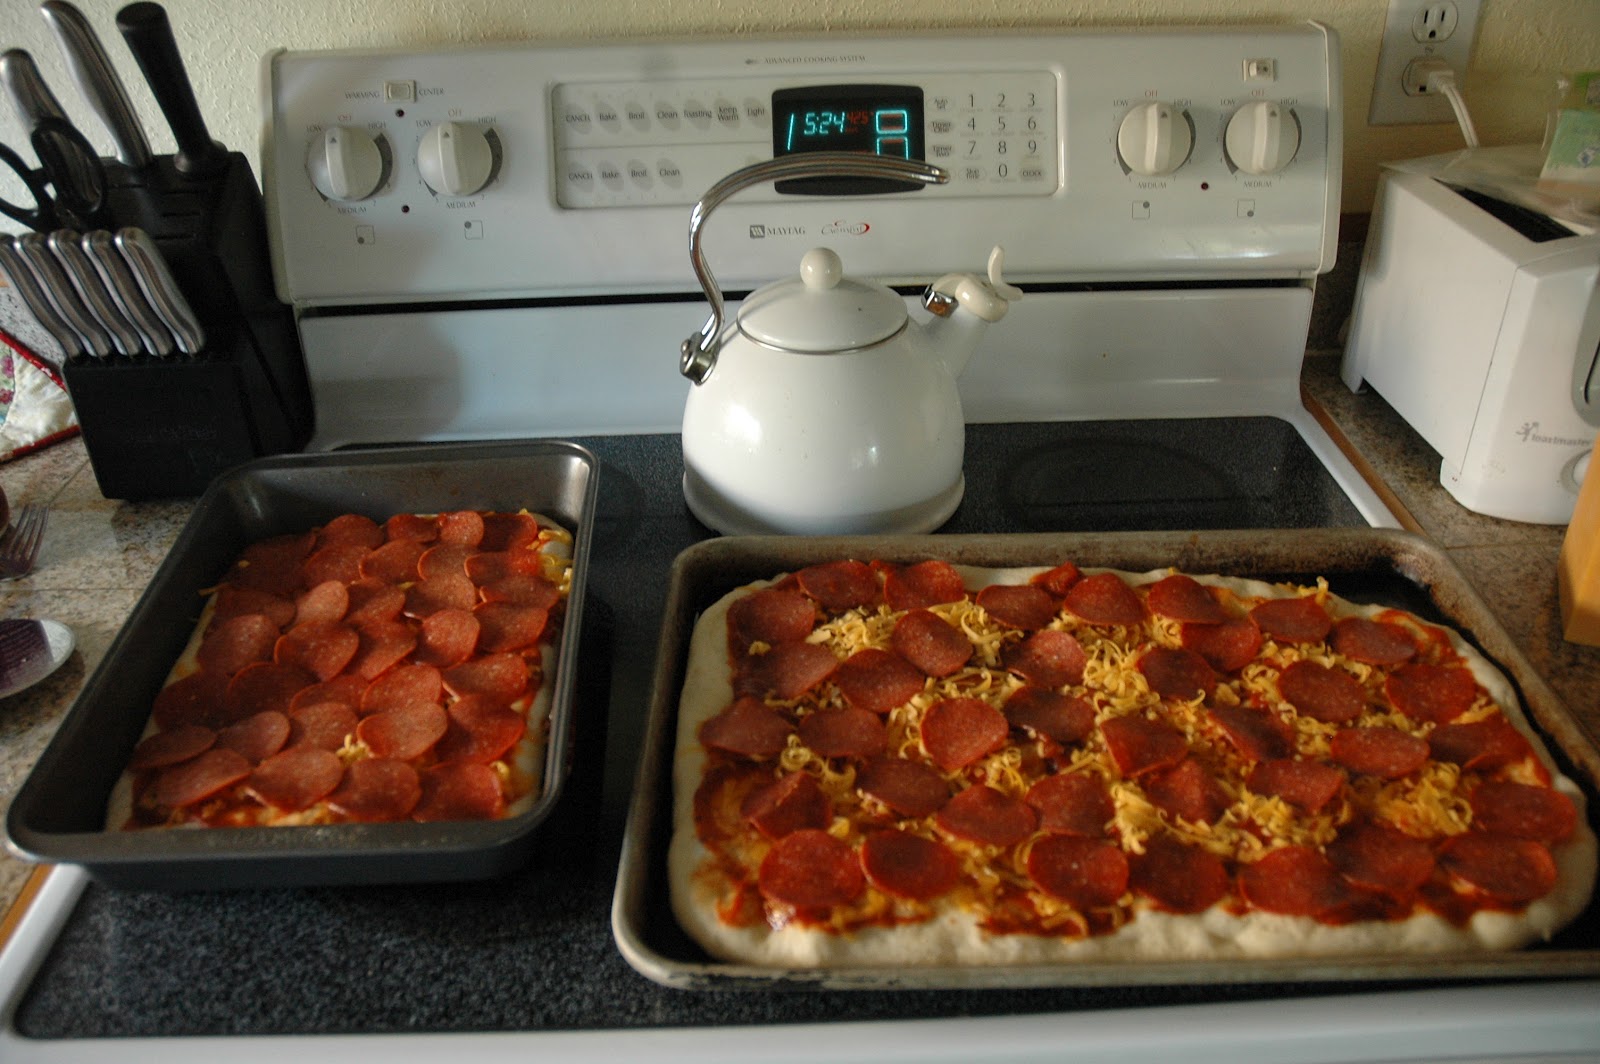
2 Pizza's for under $9.00...

Pizza is a weekly event around our house...and because of that, I had to learn to make pizza for cheap.  Thanks to Winco...I can make one thin crust pizza (my hubby's favorite) AND one thick crust pizza (my favorite youngest daughter's favorite) for a total of $8.52.  This is enough pizza to stuff ourselves silly for dinner and have some for lunch the next day...unless your favorite youngest daughter and her friend raid the fridge for a midnight snack; then what's left is quickly grabbed by the hubby for his lunch leaving me without one bite of leftover pizza.  Doesn't seem fair does it?  Next time I make it, I am hiding the leftovers deep, deep, deep in the fridge and am eating every single bite myself!


I drizzle olive oil on the bottom of each pan and then add the dough.  I then pre-bake them for about 10 minutes in a preheated 425-450 degree oven.  I find that by baking the dough off for a bit...the crust is much firmer and doesn't get soggy from the toppings.


Next up ~ I used some Ragu pasta sauce that I stocked up on when it was 49 cents a jar.  Then came some shredded cheese and pepperoni.  On the thin crust I added some red onions and olives as well. 


All baked and ready to eat...so yummy!


Cost Breakdown:

Dough (Winco) ~ $1.48 each (I used two)
Cheese ~ $3.00
Pepperoni (Winco) ~ $1.28
Olives (Winco) ~ 78 cents
Onion ~ 25 cents
Ragu Sauce ~ 25 cents (I used 1/2 a jar which cost 49 cents)

Total for both pizza's ~ $8.52.

Sunday, June 17, 2012

Father's Day means Cinnamon Rolls

It's Father's Day and that means homemade cinnamon rolls.  Back in the old days, when they still offered Home Ec in high school...my teacher taught us how to make these super yummy cinnamon rolls.  What I love about these is that they can be made...from beginning to end...in about an hour.  You don't have to let the dough raise a couple of time for a couple of hours...you just mix, wait, roll and bake.  This recipe is a family favorite and always makes my hubby and kiddies very happy.


I like to roll out my dough really thin so I can have lot's of
layers of cinnamony sugary goodness.


I topped the dough with a cube of butter and a cube of margarine and added brown sugar by the handful until it was covered and then sprinkled cinnamon over all.  I like the unsalted butter and margarine combination because when these are done cooking the bottom of the cinnamon roll is crispy with a salty sweet crunch...so delish!


All rolled up, sliced and ready to go into the oven...in 20 minutes they will be done!


Fresh out of the oven and topped with a quick cream cheese frosting I whipped up. 


Cinnamon Rolls

1¾ cups very warm water (approx. 110°)
1/2 cup oil
1/2 cup granulated sugar
2 eggs ~ beaten
3 T yeast
5¼ cups flour (okay to use up to 2 cups of wheat flour)
1 tsp. salt
1 t. vanilla

Combine warm water, oil, sugar and yeast in a large bowl and stir until just blended.  Cover with a light towel and let rest for 15 minutes.  Add beaten eggs, flour, salt and vanilla.  Mix until the dough forms a ball, if the dough remains sticky; keep adding flour slowly until the dough stiffens up into a ball.  Knead until smooth.  Roll out dough to a thin rectangle on a floured surface.  Spread dough with one cube of butter and one cube of margarine (or any combination you may desire); top with brown sugar and cinnamon.  Roll up and slice into 12 sections.  Place into a greased pan and let sit for 10 minutes.  Bake at 400 degrees for 15 to 20 minutes, until light brown.  Top with a frosting of your choice if desired.

**NOTE:  I must have been half asleep when I made these this morning because I forgot to add the 2 beaten eggs.  They tasted fine and I couldn't tell a difference.  Also, I don't knead these by hand anymore...that's what I have a Kitchen Aid for. 

Monday, April 2, 2012

A Wonderful Dinner

Tonight was a great night...my hubby and I working together in the kitchen to create an amazing dinner.  Tonight we whipped up some fish tacos ~ A MAZ ING!  Mike started off making the white sauce:


White Sauce for Fish Tacos


1/2 cup sour cream
1/2 cup mayonnaise
1 lime, juiced
1 jalapeno pepper, minced
1 tsp capers, minced
1/2 tsp dried oregano
1/2 tsp ground cumin
1/4 cup fresh cilantro, chopped


Mix all together and let it sit for awhile to allow the flavors to meld.


While he was whipping the white sauce up...I was chopping up green cabbage and making up a wicked mango/papaya salsa.


Mango/Papaya Salsa

1 cup mango and/or papaya, chunked up
1/4 cup red onion, diced
1/4 cup fresh cilantro, chopped


While I was chopping and mixing...my hubby got to cooking up the cod.  Safeway has delicious cod on sale for $3.99 a pound.  I bought a couple of pounds but after tasting it...I should have bought a freezer full!  He seasoned it with some Cajun spice mixture that my brother-in-law was nice enough to leave at our house when he brought it for a dinner party.  Hubby then cooked up the fish in a pan with a bit of olive oil in it...perfection.


So here is how it worked:

Take a flour tortilla and put it on a plate, slather on some white sauce (be generous!), top with some crunchy cabbage, add the perfectly cooked fish, add some of the sweet delicious mango/papaya salsa and top with a bit more of the white sauce. 
ABSOLUTE PERFECTION! 


This was the perfect dinner ~ my favorite guy and I working together to make a meal that was incredible!

Wednesday, February 22, 2012

Homemade Syrup, Homemade Ranch and a Flour Tortilla Update

I am going to live!  This afternoon, after being sick for 5 days, home from work for two days...I am going to survive my very nasty cold.  My gosh...this was one of the worst colds I have had in a loooonnngggg time...it kicked my butt!

However, today I ONLY took two small naps, took a stroll to soak in some unexpected sunshine and made some homemade tortillas.  I am ready to head back to work tomorrow.

Here are a couple of recipes I made before I hit the couch for an extended stay:

Homemade Maple Syrup

1 cup water
1 cup white sugar
1 cup brown sugar
1 tbsp. maple flavored extract

Bring the water and both sugars to a boil in a saucepan over medium-high heat.  Reduce heat to medium-low and stir in the maple extract.  Simmer three minutes longer; can be stored in the refrigerator. 


Next up ~ our favorite ranch dressing.  This recipe was created by the Everett Public Schools Food & Nutrition department.  We needed to find a good dressing, that kids would like, but had less sodium.  This recipe is a winner.  My hubby LOVE's this dressing.  Feel free to tweak the onion and garlic powder if you like a little less bite or a bit more.


Ranch Dressing
2 cups buttermilk, low fat
3/4 cup mayonnaise, light
2 tsp. garlic powder
2 tsp. onion powder
1/2 tsp. black pepper
1 tbsp. parsley, dried
2 tsp. granulated sugar

Combine all ingredients and mix thoroughly.  Dressing will thicken as it sits.   Keep refrigerated.


and a Flour Tortilla Update...


I made homemade flour tortillas tonight for our steak fajitas...they were wonderful.  I used barely any flour when I kneaded and rolled them out and I cooked them at a lower temp for less time; these changes created a really good tortilla.  Next time I will cut the salt in half.  I could taste the salt and I don't think it is necessary to have it be such a bold flavor.

Last but not least...rumor is that Albertson's will be having double coupons in this upcoming Sunday paper...woo hoo!


Saturday, February 11, 2012

Homemade Flour Tortilla

One of the best ways to stretch your monthly grocery budget is to cook from scratch.  Today I decided to try making flour tortillas.  I had everything on hand and was excited to use my lefse pan for something other than lefse!

Here's the ingredient this recipe used:


After mixing and kneading:


Frying...


And the finished product...


Flour Tortillas
1 cup all-purpose flour
1 cup whole wheat pastry flour
1 t salt
1 ½ t baking powder
2 t vegetable oil
¾ cup warm milk
Stir together flours, salt, and baking powder.  Stir in the oil and warm milk (I warmed up in the microwave).  Gently knead for a couple of minutes until the dough is soft and supple.  (You may need to add a couple more tablespoons of flour to ward off the stickiness, but don’t overdo it.  Too much flour and the resulting tortillas will be tough.  Cover the dough with a clean dishtowel and allow it to rest for 20 minutes.  Cut the dough into 8 equal pieces and roll out, using as little flour as needed, into rough circles, about 8-inches in diameter and 1/4th to 1/8th inches thick.  Fry them on a hot cast iron skillet for about 45 seconds per side.  As you finish the tortillas, wrap them in a clean cloth.  Serve warm. 
So...what do I think?  They tasted good ~ especially with melted cheese....even my very picky favorite youngest daughter liked them.  That is until melted cheese dripped down her volleyball tshirt and left lots of grease stains; which meant that I had another load of laundry to do immediately (she needs to wear it to volleyball training tonight).

However, I am still testing this recipe because the person who orignally posted this recipe said that they could not be warmed up in the microwave.  I don't have time for finicky food...so I am going to see just how they hold up to the microwave and being stored in the fridge.  I will keep you posted.

I originally found this recipe on this blog:  http://mamasminutia.blogspot.com/2010/04/i-went-to-church-with-hole-in-my-skirt.html.  Please note...hers look better than mine but I will keep practicing.

Oh My! This Breakfast was Good!

I never have time on the weekdays to make breakfast...so I like to do a bit more on the weekends.  Today I wanted Dutch Babies which is a baked pancake.  I altered the recipe to make it a Weight Watcher friendly recipe.  Instead of topping it with butter, syrup and powdered sugar...I made an amazing blueberry sauce. 


Dutch Babies (Baked Pancake)

2 T. light butter
1 egg
3 egg whites
1 cup flour
1 cup milk, fat free or low fat

Preheat oven to 425°.  In a blender add the egg and egg whites and blend at high speed for 1 minute.  With the blender running on a lower speed, add the milk and flour and continue to blend for 30 more seconds.  In the meantime, add the butter to a 3 or 4 quart ceramic dish and put in the oven for 1 minute to melt the butter.  When the butter is melted, pour the batter into the pan and cook for 20-25 minutes.  1/4 of this baked pancake = 4 Weight Watchers Points Plus.


Berry Sauce
2 T sugar
1 ½ to 2 T cornstarch
2 cups berries (blueberries are my favorite)
1/3 cup water
1 T Lemon juice (optional)
 
There are 2 Weight Watcher Points Plus for this entire recipe.
Place blueberries (or berries of choice) into a saucepan; mash them up.  Add sugar and cornstarch and mix.  Add water and lemon juice and cook over medium heat until thickened.  Tastes wonderful over the Dutch Babies, pancakes, waffles, cheesecake, angel food cake, scones…and the list goes on.

Friday, February 10, 2012

Apple Pie Baking in the Oven

On Sunday's I love to make a home-cooked dinner and dessert...it is a great way to finish the weekend.  This past Sunday my hubby came home to the smell of apple pie baking in the oven.  The best part was ~ it was super easy due to the apple pie filling I had canned this past fall.


Apple Pie in a Jar

4 ½ cups white sugar
1 cup cornstarch
2 tsp. ground cinnamon
¼ tsp. ground nutmeg
1 tsp. salt
10 cups water
3 tbsp. lemon juice
7 quarts apples ~ peeled, cored and sliced

Place a rack in the bottom of a large stock pot.  Fill pot with hot water.  Sterilize (7) 1 quart canning jars, 7 lids and 7 rings by placing on rack, jars upright.  Bring water to a boil.  Boil for 10 minutes.  Remove with a holder and allow jars to air dry.  Save water for processing apples. 

Combine sugar, cornstarch, cinnamon, nutmeg, salt, and water in a large saucepan.  Place over high heat and cook until thick and bubbly, stirring frequently.  Remove from heat and stir in lemon juice.  Tightly pack apples into sterilized jars.  Slowly pour syrup over apples, covering them completely.  Gently tap jars on countertop to allow air bubbles to rise.  Screw lids on jars. 

Carefully lower jars into pots using a holder.  Leave a 2 inch space between jars.  Add more boiling water if necessary, until tops of jars are covered by 2 inches of water.  Bring water to a full boil, then cover and process for 30 minutes.  Remove jars from pot and place on cloth-covered wood surface, several inches apart, until cool.  Once cool, press top of each lid with finger, ensuring that the seal is tight (lid shouldn’t move up or down at all).  Sealed jars can be stored for up to a year.


My Favorite Pie Crust

4 cups flour
1 ¾ cups shortening
1 tbsp. sugar
2 tsp. salt
1 tbsp. vinegar
1 egg
½ cup water

With a fork, mix together flour, shortening, sugar and salt.  In a separate dish, beat remaining ingredients.  Combine both mixtures with a fork until all ingredients are moist.  Using hands, mold dough into a ball and chill at least 15 minutes before rolling it into desired shape.  Dough can be left in the refrigerator for up to days or it can be frozen until ready to use.  Makes (2) 9-inch double pie crusts.


Sunday, January 29, 2012

Getting Creative in the Kitchen

Tonight we tried a new recipe ~ Albondigas Soup.  We call it Meatball Soup.  Last week I made up some meatballs which I threw into the freezer and my pantry is stocked with chicken and beef broth...so it was a perfect night to make some soup.


Let the prepping begin.  I chunked up 3 potatoes and finely chopped up some celery.  Instead of chopping up carrots...I shredded them.  For some reason I hate eating cooked carrot chunks...but shredded is fine.  In my dutch oven I have sauteed up some chopped onions and minced garlic.


This really isn't a very flattering picture...but it tasted good.  This picture shows the meatballs and cilantro that I added.  I also added some chili powder, dried oregano, and additional pepper, garlic powder and onion powder.  I like my soups to be hearty in flavor and the original recipe was too wimpy for me.


I needed something to go with this soup and found some leftover biscuits that I split in half and buttered (with a great Tuscan flavored butter spread) and toasted.  Then I topped with a bit of shredded cheese and popped them back into the oven for a few seconds to melt the cheese...delish.

It was nice having dinner with my hubby...he is working a side job and will be gone during the weekends for the next month or two.  I had this soup cooking when he got home and the first thing he said..."I knew the house would smell good when I got home".  Is that the greatest compliment or what!

Recipe:

Albondigas Soup (or as we call it ~ Meatball Soup)
1 lb. ground beef
1 bunch cilantro, finely chopped
1 small onion, chopped
4 cloves garlic, minced
1 pinch salt
1 pinch onion powder
Salt & pepper to taste
4 (14.5 oz) cans chicken or beef broth
2 large carrots, shredded
3 stalks celery, finely chopped
2 potatoes, cubed
 Place the ground beef, ½ the cilantro, ½ the chopped onions, ½ the garlic, garlic salt, and onion powder into a bowl.  Sprinkle with salt and pepper and mix gently until combined.  Form the meat mixture into golf ball-sized meatballs.  Cook the meatballs either by frying on a stove top or baking in the oven.  In a dutch oven (or large pot) spray with pan spray and cook the remaining onions and garlic over medium heat until translucent, about 10 minutes.  When onions and garlic are cooked, add the chicken and/or broth, carrots, celery and potatoes.  Bring to a boil over high heat; reduce heat and simmer until potatoes are nearly tender, about 15 minutes.  Add the meatballs and the remaining cilantro; simmer for an additional 30 minutes.  Season to taste…I added more garlic powder, onion powder, dried oregano, chili powder, and pepper to create a bit more spicier broth.